Chloroplast Diversity
ABLE 2019
This version of our student lab has been modified for the 'Using Foldscopes™ for Offline Exploration in Online Biology Courses' major workshop at ABLE 2019. If you have attended the workshop and have already prepared and posted your algae specimen, take the following steps:
(1) Download the student questions document from the Handouts box in the sidebar, at left. [A hard copy was also provided during the workshop.]
(2) Skip to the Chloroplast Density page of this lab (p. 7) and continue from there.
If you would like us to include your ideas for using Foldscopes in the revised manuscript for this workshop, please fill out this form. Short- and long-form evaluations of the workshop itself should be completed during the conference, at the direction of the ABLE 2019 organizers.
In this lab you'll use your own portable microscope to explore the microscopic world and share what you find with the rest of the class. You'll also work with micrographs to explore aspects of chloroplast morphology in different plant and algal tissues.
After completing this lab you should be able to:
1. Assemble a portable microscope, collect and prepare specimens, and capture and share images of what you find.
2. From micrographs, recognize and compare chloroplasts from a variety of plant and algal species.
3. Use Fiji/ImageJ software to collect data from images.
4. Relate quantitative and qualitative data about chloroplasts to cell growth, structure, and function, and to phylogenetic relationships among groups of photosynthetic organism
Image Credits
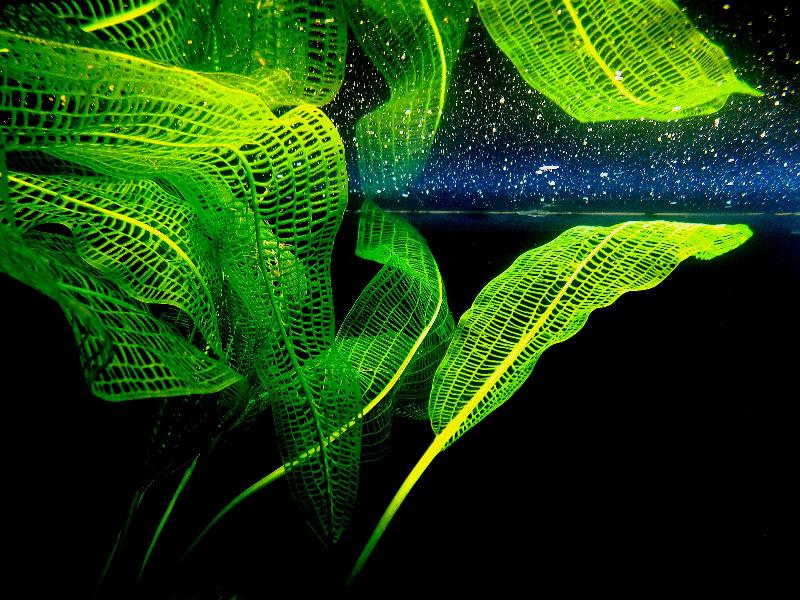
chloroplasts of lace plant (Aponogeton madagascariensis) by Jacob Fletcher
Notes
1Fiji is just ImageJ.
The Chloroplast Diversity Lab was developed by Jennifer Van Dommelen and Jacob Fletcher, supported by a Teaching and Learning Enhancement Grant from Dalhousie's Centre for Learning and Teaching. We thank sessional instructors Beverly Hymes and Herbert Vandermeulen for their feedback on early drafts of the lab.
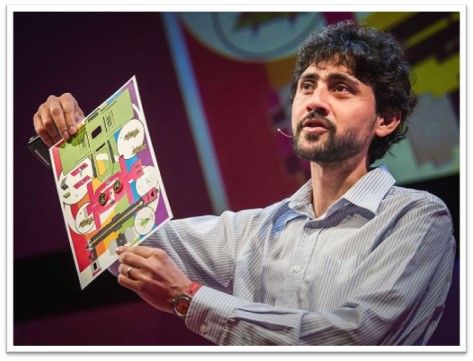
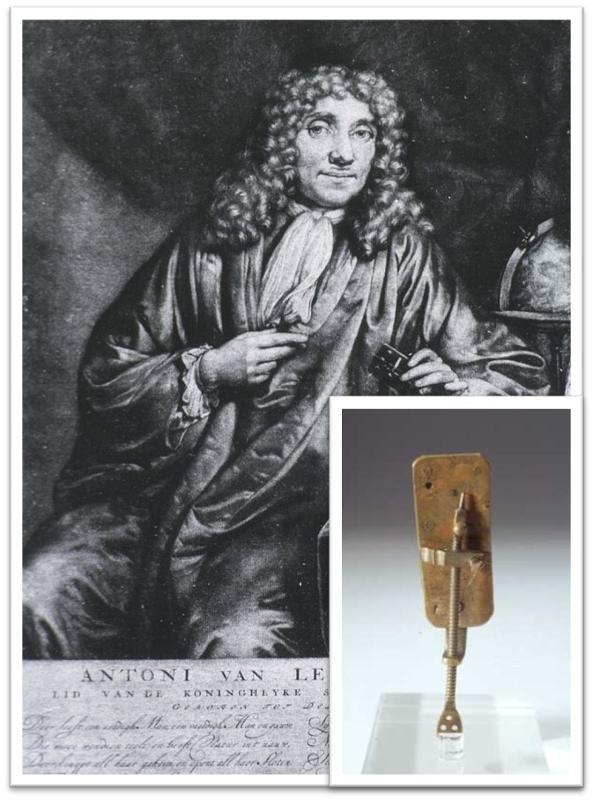
The foldscope, invented by Stanford University engineer Manu Prakash, is a contemporary version of the instrument perfected by Antonie van Leeuwenhoek in the late 17th century. Get ready to channel your inner Leeuwenhoek!
Your foldscope kit includes printed instructions for assembly, and there are also video tutorials posted at the Foldscope website.
Based on our experience with the foldscopes, we can also offer these tips:
Once you have your foldscope assembled, you're ready to start exploring! See the Finding Specimens for the Foldscope, Slide Preparation and Photo Tips and Sharing Your Discoveries pages of this lab for additional instructions.
|
Portable Microscopy Then and Now
|
|
"Pencils are everywhere; so should be microscopes." - Manu Prakash (with a Foldscope prototype in 2012)
"Almost everything he saw, he was the first person ever to see." - Douglas Anderson on Leeuwenhoek (2014, p. 25)
|
Image Credits
Manu Prakash by https://www.ted.com [CC BY-SA 4.0], via Wikimedia Commons
Portrait of Antonie Van Leeuwenhoek, [Public Domain], via Wikimedia Commons
Van Leeuwenhoek microscope by Museum Boerhaave, Leiden (Museum Boerhaave, Leiden) [CC BY-SA 3.0], via Wikimedia Commons
Notes
*We suggest some other miscellaneous items that you may find useful on the Finding Specimens for the Foldscope page of this lab.
References
Anderson D. 2014. Still going strong: Leeuwenhoek at eighty. Antonie van Leeuwenhoek 106: 3-26.
While collecting specimens for this lab is a low-risk activity, you are responsible for using common sense and due caution. You should be able to collect and prepare interesting specimens without entering bodies of water or using
potentially dangerous tools such as blades or scissors. Collect only in a location and manner that you judge to be safe, and do not risk injury or misadventure for the sake of this lab.
Please DO:
Please DO NOT:
We've chosen chloroplasts as the organelle of interest for this lab because they are relatively large and easily recognizable. If you can find your own specimens that clearly show chloroplasts, then that's great, but it's not strictly necessary. Flora or fauna, there's plenty to see with the foldscope, and the most important aspect about this part of the lab is that you get to experience the thrill of discovery!
Additional Equipment
We provide you with a foldscope, transfer pipette, and a pair of gloves. You should also gather together the following items:
Algae and Plants
Your best chance for getting a good view of chloroplasts is to find some filamentous green algae. At your collecting site (see Collecting Tips: Locations, below), look for rocks or muddy patches with a greenish cast or film on the surface. In lakes, you may also see obvious clumps of filamentous algae that are either clinging to rocks or floating freely in the water (but see Notes of Caution, above). On shore, look for a green film on the surface of rocks. If you or someone you know has a fish tank, you might find some algae there.
Plant leaves may also work, but they must be very thin - if a specimen is more than a few cell layers thick, then it will be too thick for the cells to be visible. Choose leaves from plants that that are naturally very small (rather than using fragments of larger leaves), and look near the exterior margins of the leaf or near the veins, where the leaf tissue is typically thinner. Mosses and other ground-hugging weedy plants are good candidates, as are fish tank ornamentals such as Elodea.
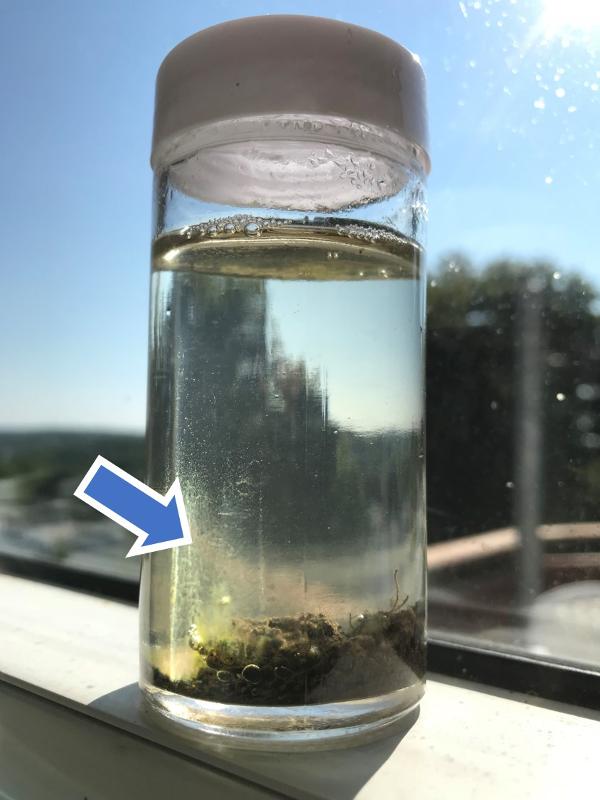
If you collect a small amount of mud from a damp or marshy area, you have a good chance of finding motile organisms, even if you don't find algae. You may even want to try collecting a spoonful of soil in a glass jar, adding some water, and leaving it to sit in a sunny location. After a few days, you may have some algae growing in the jar! (If you try this, choose soil from a damp or shaded area with lots of plants growing).
Other Specimens to Try (Optional)
None of these have chloroplasts, but they could be fun to try...
On / Near Campus
Further Afield
Take a few photos of the site in general and the specific spot where you collect your specimen, safely collect the specimen, and make notes about the time, location, and weather conditions (see the assignment document attached to the dropbox for this lab).
If collecting wet or muddy specimens, nearly fill your specimen bottle with water from the site; then add your specimen. Or, bring some tap water with you, for algae that you may collect from relatively dry spots as well, such as the surface of rocks or soil. For sites on Halifax Harbour or the Northwest Arm, collect a small amount of water at the site. (This will be seawater; any specimens you collect that came from seawater should be stored in seawater, not fresh or tap water).
|
Finding Specimens |
|
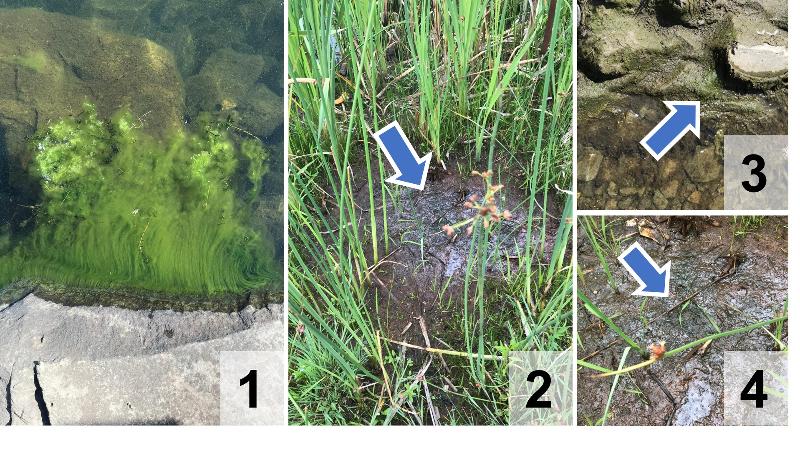
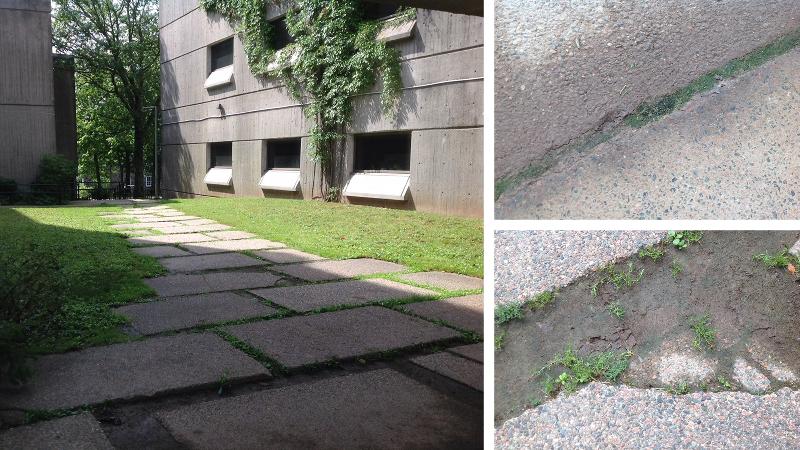
Filamentous algae in various locations: attached to rocks in Lake Banook (1 and 3); on the surface of the mud near the shore of Maynard Lake (2 and 4 - look closely for the greenish film on the mud)
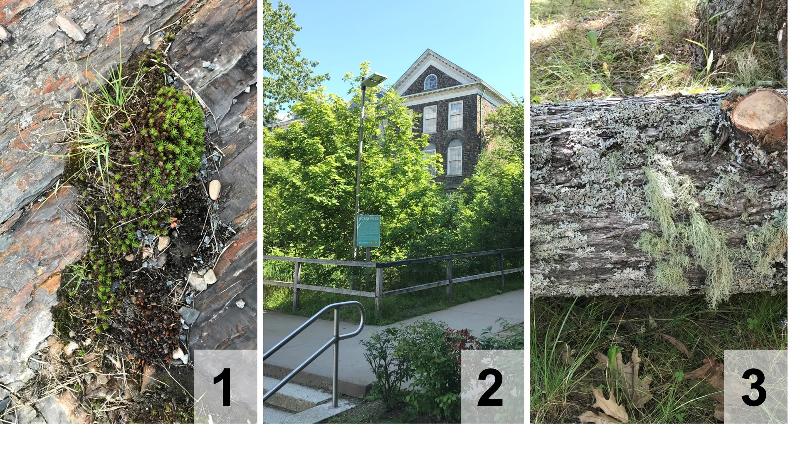
Locations around campus: (1) moss on a rock wall (2) Ocean Pond (3) lichen on a log behind Sheriff Hall (at the perimeter of the Dalhousie Outdoor Ecolab)
Locations around campus: the walkway behind the LSC, between the Psychology wing and Oceanoraphy (Sherriff Hall is in the distance, behind the trees; the Dalhousie Outdoor Ecolab is among the trees)
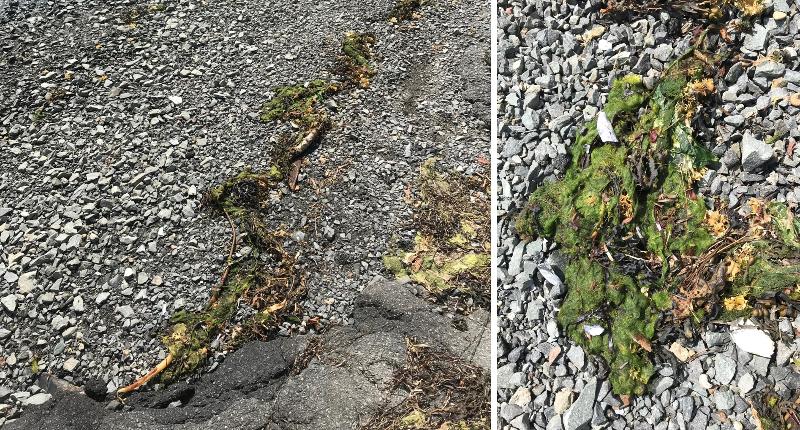
Drift algae on the beach at the end of South Street, on the Northwest Arm.
Grow your own algae in a jar - just add water!!
|
View the tutorials on this page (also posted at https://www.foldscope.com/tutorials/) for tips on preparing your slides and taking photos.
Getting a decent photo may require some improvisation - if your camera lens is raised, you may find that the ring sticker that is meant to attach the coupler to your phone doesn't work very well. You may have to use sticky tack or extra tape to hold the coupler in place, or borrow another phone or tablet with a 'flat' lens (i.e., one that is flush with the surface of the device) to take the photo.
|
Foldscope Tutorials |
|
Note that glass slides are not included in your kit; paper slides start at 1:27
|
Share a photo or video of your foldscope specimen by posting it to the appropriate Padlet gallery (morning session or afternoon session) below: double-click anywhere on the 'corkboard' or click on the pink circle in the lower right-hand corner of the screen. You will be prompted to add some text and upload your photo/video.
In the Title field, provide as much information as you know about the identity of the organism and the part of the organism pictured. Common names are fine, scientific names are great if you know them. If you don't know what your photo shows, use 'unidentified'.
In the Write something... field, include information about your collection site and who you are. See examples below.
You can also "like" and comment on your peers' posts.
Padlet gallery for ABLE 2019 workshop morning session:
Padlet gallery for ABLE 2019 workshop afternoon session:
|
Padlet Sample Post (Text Only) |
|
e.g. when you know the scientific name:
Title: black medic (Medicago lupulina) leaf
when you don't know the scientific name, give as much information as you can; e.g.:
Title: grass root Title: mushroom spore Title: unidentified plant leaf Title: unidentified alga(e) Title: unidentified protist Title: unidentified
etc.
Write something...
Collection site: geographic location where you collected your specimen Date collected: the date you collected the specimen (not the date you uploaded the photo) Submitted by: your full name (optional for ABLE 2019 workshop) |
Digital files include metadata with information like when and where a photo was taken, the type of camera used, etc. If you wish to do so, you have some ability to remove this information from your photos by adjusting the location/privacy/photo settings on your device before taking your photos, or after-the-fact by changing the photo file's properties. For more information, see Remove metadata from Office files, PDFs, and images*.
The Padlet gallery is intended to be a private board for members of the class to share their work and to comment on that of their peers. Please do not download, copy, share, or embed individual photos or the Padlet board in whole or in part to any external location without the written permission of the instructor and the student or students whose work you wish to copy/share. The gallery will be archived at the end of term.
If you would like to share your image with a larger audience, you might consider joining the Foldscope Microcosmos community, or creating an account with iNaturalist, which has a dedicated Foldscope community. The iNaturalist website / app can also help you with identification - when you upload a photo, it will make suggestions about the identity of your organism.
Creating accounts at these sites is entirely up to you; even if you choose not to, you can still see what others from around the world have discovered with their foldscopes!
*The 'Remove metadata... ' link is provided for information purposes only, and not as an endorsement of links and services mentioned in the article.
You will need Fiji/ImageJ for the second part of this lab, in which you will collect data from images. If you have taken BIOL 1010, BIOL 1011, or BIOL 1020 you may have used this program and have it installed on your computer already. If not, go to https://imagej.net/Fiji/Downloads to download and install the version of the program that is right for your computer.
These instructions should work for Fiji and older installations of ImageJ:
1. Click on this thumbnail to open a larger version of the photo. Right-click on the full-size version and save a copy of it to your computer.
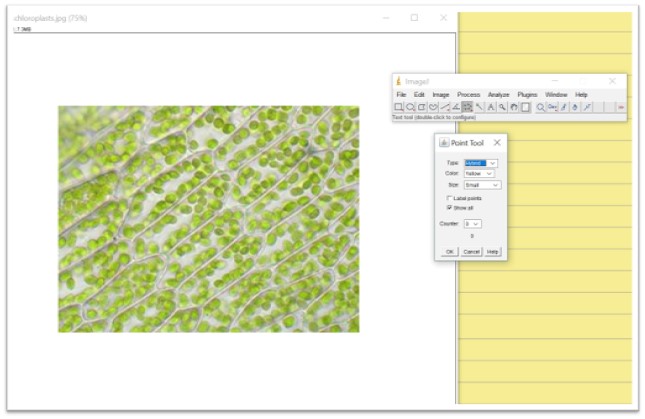
2. Start the Fiji/ImageJ program; a small dialog box will appear on your screen (upper right in the screen capture below). Use File --> Open... to open the photo you saved in the previous step.
3. On the Fiji/ImageJ icon ribbon, click on the Point Tool icon. If it is set to 'Point' (a single square with cross-hatches), right-click on the icon to set it to 'Multi-point' (several hatched squares). The Point Tool dialog box may appear; if it doesn't, double-click on the Point Tool icon. Keep the default settings; deselect Label points and Show on all slices.
4. Move your mouse over to the photo and start clicking on individual chloroplasts. All you have to do is click; a running tally will appear below the Counter drop-down menu. Click on as many chloroplasts as you wish to confirm that this function is working properly. If it is, you are ready to proceed with the next part of the lab (beginning on the Chloroplast Density page) at any time.
|
Fiji/ImageJ Point Tool |
|
Screen capture showing the Point/Multi-Point Tool in ImageJ.
|
Image Credits
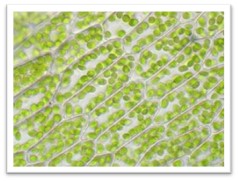
moss leaf cells Funsci.com. (2018). 3 - Lower Plants. [online] Available at: http://www.funsci.com/fun3_en/guide/guide3/micro3_en.htm#3.1 [Accessed 5 Sep. 2018]
ImageJ screen capture by Jennifer Van Dommelen
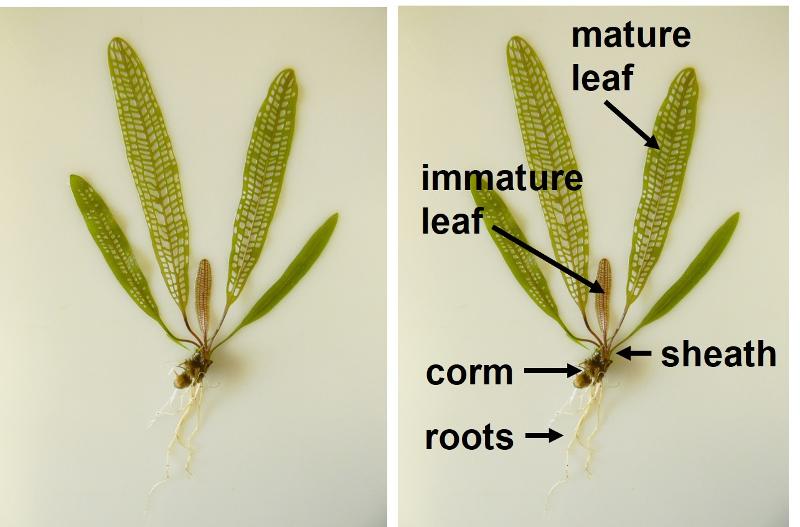
For this part of the lab we're going to take a closer look at chloroplasts, and relate that information to cell structure, function, and evolution. Our model organism for this activity is the lace plant (Aponogeton madagascariensis), so named for its unique leaf morphology. The characteristic holes in the leaves of the lace plant are due to a process called programmed cell death, or apoptosis, where cells die "on purpose" during the development of the organism or structure. The lace plant is an emerging model species for cell death research, due to this highly predictable cell death pattern, and to its thin transparent leaves which allow for extensive microscopic observation of cellular activity throughout development. There are a few hypotheses about why the lace plant forms these holes, such as an anti-predation/camouflage strategy, or to decrease water resistance. The ultimate reason, however, remains a mystery (perhaps one you will solve some day?). Although it is an endangered species in the wild, its natural beauty and uniqueness has made it a popular cultivated plant not only for scientists, but for aquarium hobbyists as well.
|
Lace plant (Aponogeton madagascariensis) |
|
botanical illustration by Sir William Jackson Hooker (1856)
A. madagascariensis in an aquarium.
|
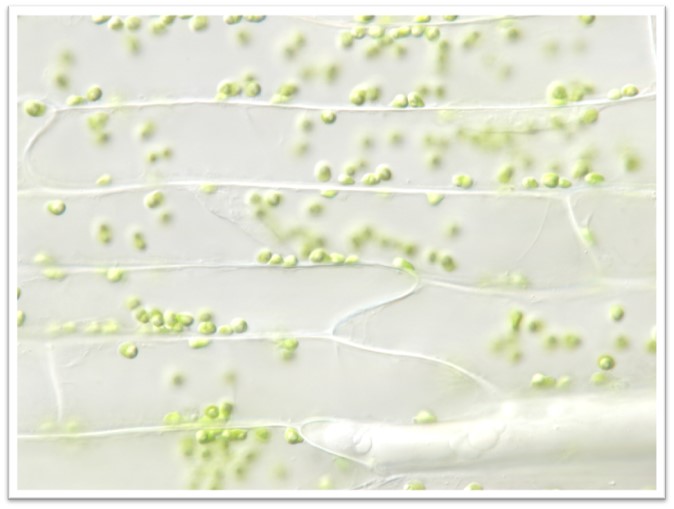
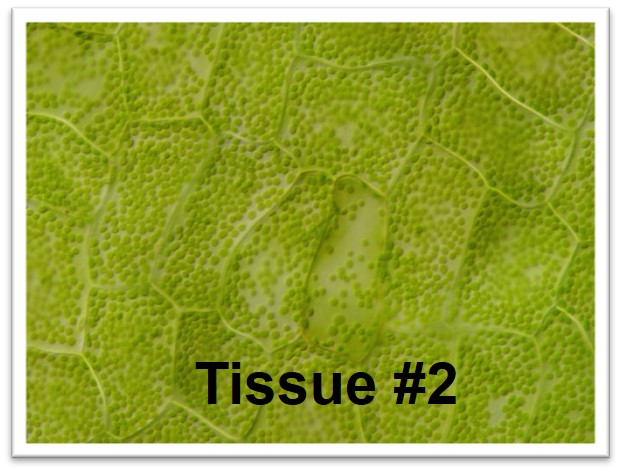
The images below are micrographs of cells from two different parts of the lace plant. Click on the photos to open up larger versions, save a copy of each large version to your computer.
Use Fiji/ImageJ (see the Downloading, Installing, and Testing Fiji/ImageJ page in this lab) to count the chloroplasts in five different cells from each photo (identified for you on the larger versions). Enter your data into the table in your lab document and answer the associated questions.
.jpg)
The last question for this section in your lab document refers to the labelled photo of a lace plant below. (The sheath is a protective layer of cells found around the base of the stem, and the corm is an underground shoot.)
lace plant illustration by Sir William Jackson Hooker (1785 - 1865) [Public domain], via Wikimedia Commons
lace plant aquarium photograph [CC0] via Pixabay
In the previous activity you looked at a difference in chloroplast density between different tissues of the same plant. For this activity, we'll consider some differences in chloroplasts among several different species of plants and algae.
First, click through the images below, which feature different species of land plants. Each photo of a plant in situ is followed by a micrograph of chloroplasts from the same plant species. As you study the pictures, consider whether the variability in shape that you see among the chloroplasts is relatively high (i.e., lots of variation in shape) or relatively low (i.e., not much variation in shape).
Now that you've viewed the photos, what do you think? Mouse over your choice for feedback:
(1) The land plant chloroplasts show relatively high variability in shape among different species (i.e., they all look quite different from each other).
(2) The land plant chloroplasts show relatively low variability in shape among different species (i.e., they all look very similar to each other).
Time to count more chloroplasts! You won't need Fiji/ImageJ this time, however. In the interactive below, view each image and make a rough estimate as to how many chloroplasts you see. Click on 'SHOW' to reveal the correct answer. Click on the right-pointing arrow to advance to the next image (left-pointing arrow to return to the previous image).
Are you surprised by the results? Click through to the next page of the lab for an explanation...
Chloroplasts are just one type of plastid - a category of closely-related organelles found in photosynthetic eukaryotes. Chloroplasts are specialized to perform photosynthesis, while other types of plastids perform other functions, such as starch or oil storage, pigment production and storage, gravity sensing, and production of secondary metabolites (Solymosi, 2012).
The activities on the previous page are intended to demonstrate that the cells of land plants tend to have relatively large numbers of similar-looking chloroplasts, while algal cells tend to contain relatively few chloroplasts, with much more variety in shape across species. And while we didn't provide any information about chloroplast size, it is also true that algal chloroplasts are relatively large compared with plant chloroplasts. They are also less specialized than plant chloroplasts, in some cases taking on the metabolic functions that are performed by different plastids in plant cells. In other words, algal chloroplasts are multi-taskers (Solymosi, 2012)!
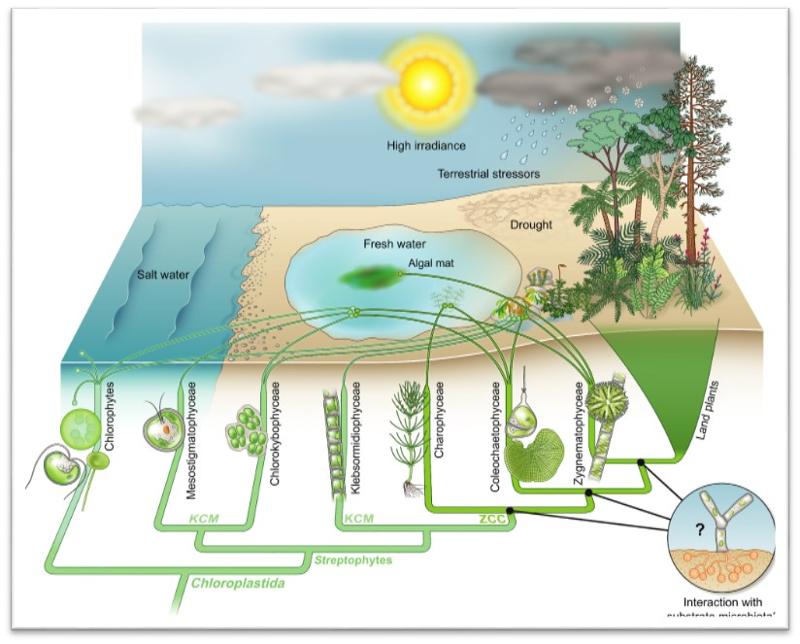
A recent paper by Dalhousie researchers Jan de Vries and John Archibald (2018) summarizes the evidence supporting the hypothesis that land plants evolved from the streptophyte lineage of algae. They assert that land plants evolved just once, and are most closely related to the Zygnematophyceae, a group of unicellular and filamentous freshwater algae.
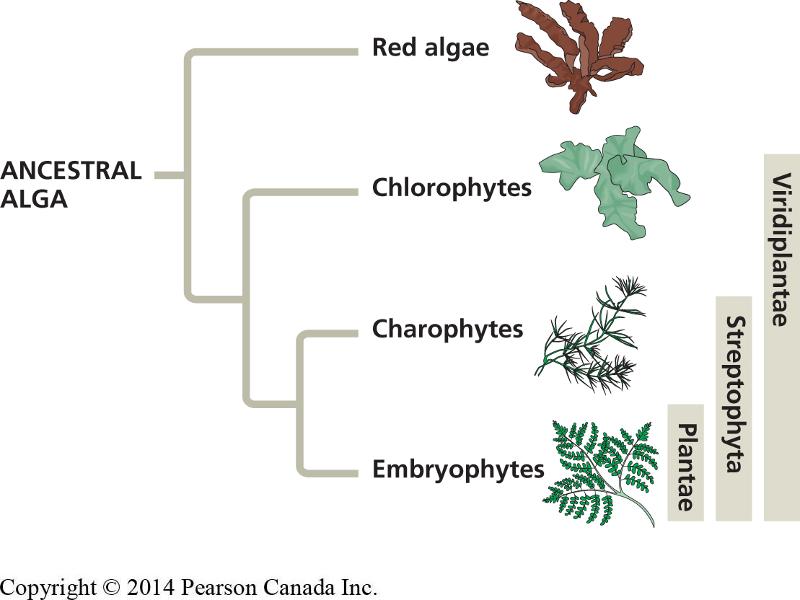
Click on the thumbnail to view a larger version of the summary figure from de Vries and Archibald (2018), and compare it to the figure from Chapter 29 of your textbook (Reece et al., 2018) reproduced below. The de Vries and Archibald (2018) figure provides more detailed information about the evolutionary relationships among members of the group identified as 'Viridiplantae' in your textbook.
Study the de Vries and Archibald (2018) figure and answer the last question in the lab assignment.
de Vries J and Archibald JM. 2018. Plant evolution: landmarks on the path to terrestrial life. New Phytologist 217: 1428-1434.
Reece JB, Urry LA, Cain ML, Wasserman SA, Minorsky PV, Jackson RB, Rawle F, Durnford D, Moyes C, Scott K, Walde S. 2018. Campbell Biology. Second Canadian Edition. Hoboken, NJ: Pearson Education Inc.
Solymosi K. 2012. Plastid Structure, Diversification and Interconversions I. Algae. Current Chemical Biology 6: 167-186.