


Observing Plasmolysis
For this part of the lab, you will use your foldscope to directly observe the effects of osmosis on plant cells -- specifically, the epidermal cells of red onion (Allium cepa).
For more information about the foldscope, please see the Assembling Your Foldscope, Slide Preparation and Photo Tips, and Sharing Your Discoveries pages of this lab.
Need More Slides?
If you have used up all or most of your slides, you can make more of your own with some heavier-weight paper and transparent tape. Try greeting cards or other similar material. The Dalhousie Bookstore or other stores that sell stationery might have something as well; if you can buy by the sheet, ask for "100 lb silk cover". The Dalhousie Print Centre, on the 2nd floor of the Life Sciences Centre (same level as the Tim Hortons), sells 100 lb silk cover for 14 cents per sheet.
The outside dimensions of the slides are 27 mm x 76 mm; you should probably make them 27 mm wide, but the length isn't quite as important. The dimensions of the rectangular "windows" are 8 mm x 16 mm. It's not crucial to stick to these dimensions exactly - you just don't want the window to be so large that it is "floppy" or bends too much.
Other Materials Required
- red onion (enough to take several pieces of the purple epidermis)
- tweezers (or your fingernails)
- tap water
- table salt
- two small cups or containers
- a teaspoon or similar small tool for measuring, such as a regular small spoon or a pop bottle cap
- a clean spoon, chopstick, or similar tool to use for stirring
Did You Know...
WHY ONIONS MAKE YOU CRY![]()
When you cut into an onion the ruptured cells deploy an airborne, sulphur-based chemical into the room.
When it mixes with the water in your eyes & nose it turns into sulphuric acid.
A chemical defence created by plants.
But there’s even more to it.. pic.twitter.com/BBh5DtuTsO
This compound is so potent however it is even toxic to the plant itself. ![]()
So intact onions don’t contain any at all. It is only created at the site of cellular damage when 2 separate chemicals come into contact with each other. Like a 90s glow stick. pic.twitter.com/PyhDTLPm1P
Plasmolysis Demonstration: Protocol
For this demonstration, you will prepare three slides, each slide representing one treatment: (1) No Treatment, (2) Tap Water, and (3) Salt Water.
Follow the steps below.
1) Prepare the Tap Water and Salt Water treatments. Add 5 teaspoons of tap water to each of your two cups. (If you are using something other than a teaspoon, add 5 of whatever it is...). To one of the cups, add 1 teaspoon (or 1 measure of whatever you're using) of salt, and stir until the salt is completely dissolved (about 2 minutes). [NOTE: Prepared NaCl solution will be available on the benches for the ABLE 2019 workshop.]
2) Obtain your tissue sections. Remove the dry outer papery layer(s) from your red onion until you get to the purple epidermis underneath (the part that we eat!). Using a pair of tweezers or your fingernails, carve a small square into the surface of the onion and peel off the outermost layer (the purple epidermis). Do this several times so that you have a number of small tissue sections - you only need three, but it's good to prepare a few extras, just in case. The most important notes here are that (a) the thinner you can get your tissue layers, the nicer they will look under the foldscope, and (b) they should be small enough that you can comfortably mount them onto the foldscope slide.
3) Soak the tissues. Place one or more tissue pieces into each of the Tap Water and Salt Water treatment cups. Allow them to soak for 5 minutes. While these tissue samples are soaking, mount another one (the No Treatment sample) directly onto a foldscope slide.
4) Record your observations. Using your phone or other device, capture an image of your No Treatment tissue sample. Mount the Tap Water and Salt Water samples on their own (separate) slides, and capture images of them as well. It is okay to use the optical zoom on your device if doing so improves your image - your photo does not need to include the entire field of view.
5) Share your observations. Post your best image from each of the three treatments to the appropriate Padlet gallery (Morning Session or Afternoon Session, or via the Sharing Your Discoveries page of this lab). Upon opening the gallery, double-click anywhere on the 'corkboard' or click on the pink circle in the lower right-hand corner of the screen. You will be prompted to add some text and upload your photo/video. Fill out the text fields as shown in the example on this page, substituting the treatment as appropriate, and your own name [optional for ABLE 2019 workshop].
Posting Your Images to Padlet

Finally, answer the questions for this part of the lab in your lab assignment document. If your own foldscope images are unsatisfactory, you can use the ones below to help you with the questions:
|
|
|
Red onion (Allium cepa) whole mount, untreated. |
|
|
|
Red onion (Allium cepa) whole mount, following immersion in tap water for five minutes. |
|
|
|
Red onion (Allium cepa) whole mount, following immersion in salt water of unknown concentration for five minutes. |
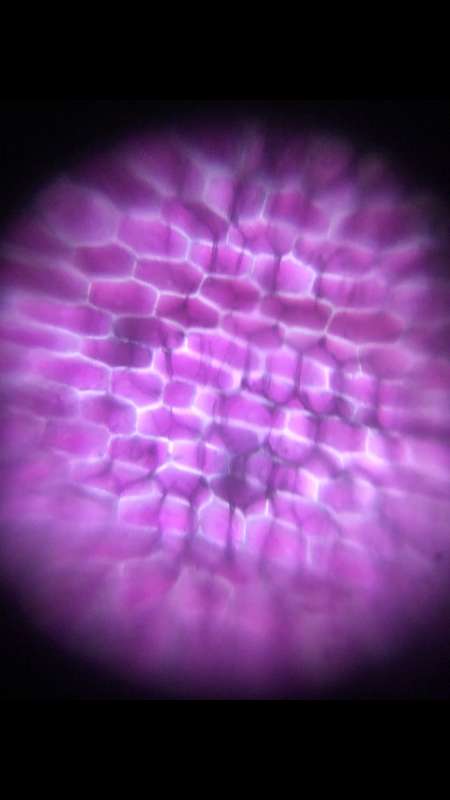
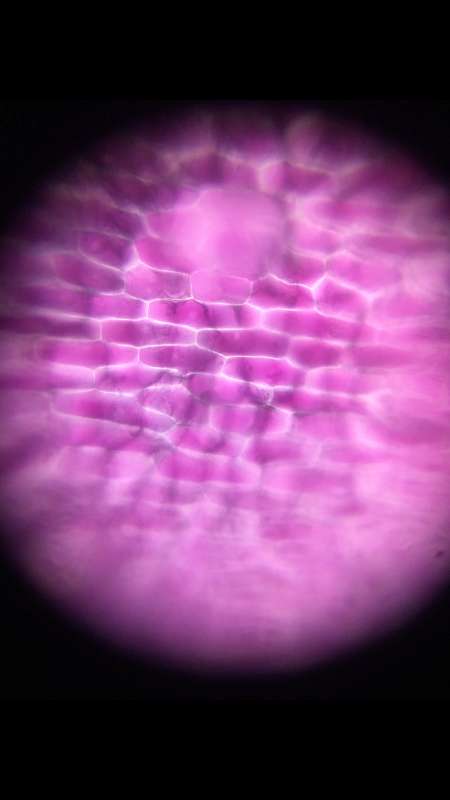
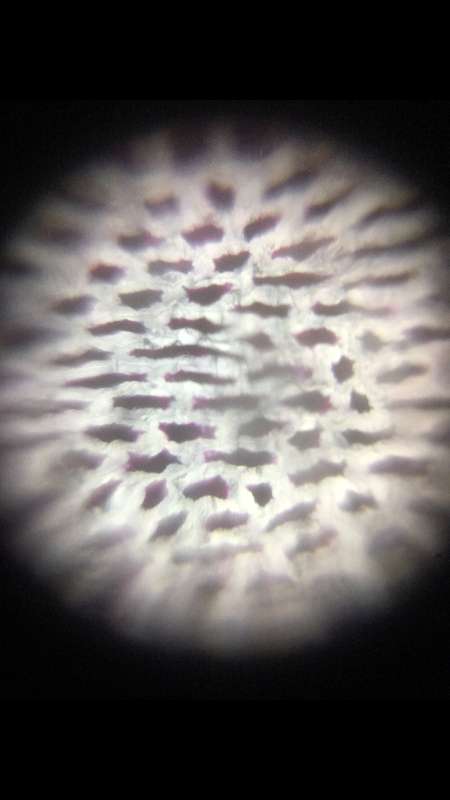
Image Credits
All photos on this page by Jacob Fletcher.